how to get your $10,000 per month Google Ad Grant in Canada.
Are you a registered charity or not-for-profit according to the Canadian Revenue Agency? You are likely eligible for up to $10,000 per month in a Google Ad Grant.

Firstly, this is not a daunting grant to acquire. Google has made it streamlined and the setup process is really the only technical component to it. Follow these steps and you’ll be getting free website hits in no time.
are you eligible to get the Google Ad Grant?
You must be a non-profit with a registered charity number with the CRA. If you can find yourself on CRA’s List, then you’re golden. There are also some criteria that will make you ineligible for the program, and they are:
- You cannot be a hospital or healthcare organization (although being a nonprofit working in the healthcare space is still valid. Such as longterm care, cancer research, etc…).
- Government-run or owned organization.
- School or academic institution, but you can still get some solid benefits from Google through their Google For Education program.
register with Techsoup canada and validate
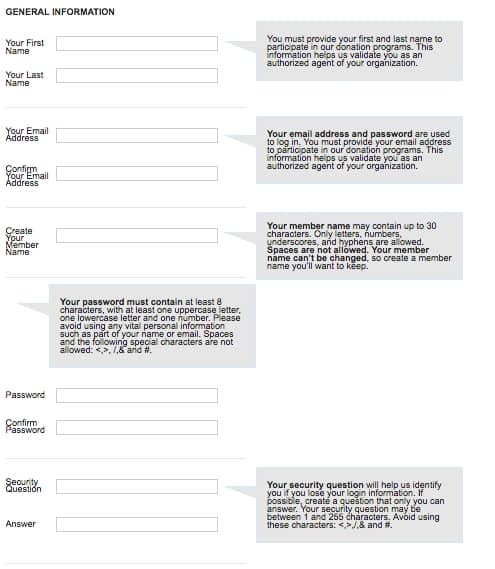
Firstly, register with TechSoup Canada. TechSoup Canada is an intermediary between you and Google — they validate whether you are, in fact, a registered charity. Click “New to TechSoup Canada” and you’ll see the form below.

Validation should not take long, and once it is done you will be given a TechSoup Canada Validation Token. Make sure to keep it copied and ready to paste later in this process.
Get enrolled in Google for nonprofits
Now that you have your validation token, your next step is getting your Google for Nonprofits going. This is where you can apply for your Google Ad grant, Google Suite (free @domain.com email & Drive), Google Maps Credits and YouTube for Nonprofits (donate button on YouTube).
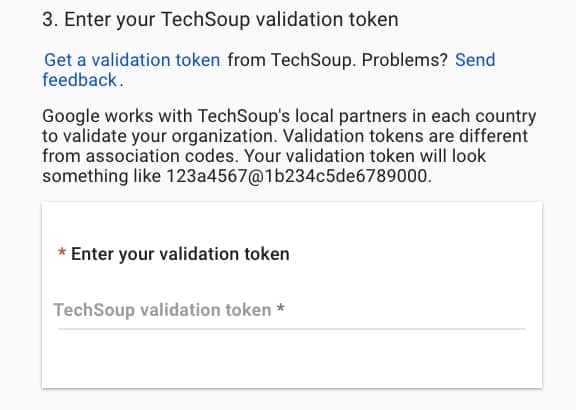
To get rolling on your registration, you head over to the eligibility page and click “Get Started”. It’ll ask for your validation token and look like this:

It’ll ask for your contact information and a bit about your nonprofit itself, as well as whether Google can email you. It’s also important to note that all communication will be coming to this email, and if any issues arise in the future, this needs to be an account you check frequently.
Once you hit submit, you will have to wait for the screeners to review it, but it generally has a high success rate. After your approval has gone through you’re all set to apply for any of the four nonprofit offers, but for this blog posts in particular we are going to focus on the Ad Grant.
Note: We often get asked if this grant will benefit Google Map visibility – unfortunately, this is only for Search Ads, but check out our other blog post on how to get your Google My Business profile running properly.
activating your google ad grant
The first step is clicking this link to get your Google Ads account going. Please be very careful following these steps or you’ll get stuck — and trust me, it’s frustrating if that happens.
Choose your billing country as Canada and your currency as USD (yes, even though you’re from Canada — this is VERY IMPORTANT). Click submit and get your ad account going. Take note of your customer ID in the top right corner. It is ESSENTIAL that you do not add any credit card information at any time — this will make you ineligible. You might get emails and pop-ups requesting payment setup, please ignore (or bypass) these or you will have to start everything from scratch again.
Next to be proactive, fill out their 10-minute survey. It is required in the approval process, so don’t forget to do it. You’ll eventually get an email for it, but it can’t hurt to do it at this point. Once this is done, you have to watch their five minute educational video and complete their quiz. Please note, if you do not watch this video all of the way through or take the quiz seriously, you can be invalidated.
Make sure you are logged into your Google NonProfit account and now you want to click “Activate” just below the Google Ad grant at the top of the list. It’ll ask you to you to use your customer ID (***-***-**** format from the top right corner of your Ads account), it’ll ask you where you heard about Google Ad Grants then click Enroll. It can take anywhere from 3-7 days for an answer.
Getting your campaign running
This is when it can get daunting and you realize that this might be a bit more complicated than you had planned. Have no fear though, Google has a really nice way to a basic setup, which utilizes their “smart campaign” strategy. It won’t be as specific and as honed, but it’ll definitely dent your monthly budget and help. If you have tried Google Ads before, then definitely go the expert route and make something beautiful.
If you do choose to go ahead with doing your own setup, here are a few tips to use that will make sure you have an effective campaign:
- Choose your keywords carefully. Make sure they are relevant to your organization and your target audience.
- Use negative keywords. These are words or phrases that you don’t want your ad to show up for. For example, if you are a food bank, you might want to use negative keywords like “restaurant” or “recipe.”
- Create separate campaigns for each of your programs or services. This will allow you to target your ads more effectively and track which ones are performing the best.
- Use ad extensions. These can help improve your click-through rate by giving people more information about your organization right in the ad.
- Monitor your results regularly and make changes as needed.
new audience targeting added in 2023
Until recently, Google Grant accounts weren’t able to use Audiences for Search Ads. But as of 2021, that’s changed! Grant accounts can now access audience targeting for Search Ads, which means you have even more opportunities to reach people who are interested in your cause. As of May 1, 2023, similar audiences (or segments) will be gradually phased out, but good ol’ audience segment targeting based upon the Google’s curated options will remain a viable option for targeting.
So, how do you get started? It’s simple! First, since you’re likely already logged into your ad account, click on “Audiences” in the page menu, then, click on the plus (+) button and select a campaign or ad group from your list. Next, choose what type of audience you want to target with your ads.
There are a few different types of audiences you can choose from:
- Affinity audiences: These are people who have a strong interest in a certain topic, like sports or travel.
- In-market audiences: These are people who are actively looking for products or services like yours.
- Remarketing audiences: These are people who have visited your website or app before.
- Custom audiences: These are people who match your own criteria based on keywords, URLs, apps, or YouTube content.
- Once you’ve selected your audience type, check the box to confirm your choice and click save. And that’s it! You’ve added audience targeting to your Search Ads.
final approval and launch
Head back to your Google Nonprofit account and finish up your final review now that everything is all set. This can take anywhere from 8-10 days, but once you’re going, it’ll be an extra $329 per day (USD!) that you can use. I mean, honestly, I’ve never had anyone hit those kind of clicks, but it’s nice to know that it’s there.
maintenance and red tape
You are meant to login every 30-days and change something in your account, which usually consists of adding/removing a keyword, but can also be more significant changes. You also need to have at least one goal setup in Google Analytics that you can quantify conversions through. How do that can be found here. We also do not recommend taking all of Google’s optimization suggestions, as not all of them benefit your visibility.
Make sure to check that you have at least a 5% clickthrough rate. The days of making a campaign that goes worldwide are a thing of the past for grants. Need to stick to a regional area so that the click rate remains high. And lastly, you have to do Google Surveys — they aren’t optional, so don’t neglect them when they come up annually.
Congrats! You’re officially the envy of all other nonprofits in your area.
key takeaway about getting your ad grant in Canada
- Firstly, register with TechSoup Canada. They are an intermediary between you and Google.
- Get enrolled in Google for nonprofits by heading over to the eligibility page and clicking “Get Started”.
- The first step to activating your Google Ad Grant is clicking this link to get your Google Ads account going.
- If you choose to do your own setup, here are a few tips to make sure you have an effective campaign:
- Choose your keywords carefully.
- Use negative keywords.
- Create separate campaigns for each of your programs or services.
- Use ad extensions.
- To be eligible for up to $10,000 per month in a Google Ad Grant in Canada, you must be a non-profit with a registered charity number with the CRA.
- However, you cannot be a hospital or healthcare organization, government-run or owned organization, or school or academic institution.

